| NeuroScript MovAlyzeR Help | Send comments on this topic. |
Glossary Item Box
| NeuroScript MovAlyzeR Help | Send comments on this topic. |
Trials
The trial is the core of the system. Settings are made at three levels: The computer (hardware-related that cannot be changed often), the experiment (settings that should remain constant for all conditions), and the condition.
This is tablet specific. Please refer to the documentation from the manufacturer for the tablet which you use.
NOTE: Important digitizer driver settings may be altered via the control panel >digitizer driver. However, we recommend the default driver settings as much as possible.
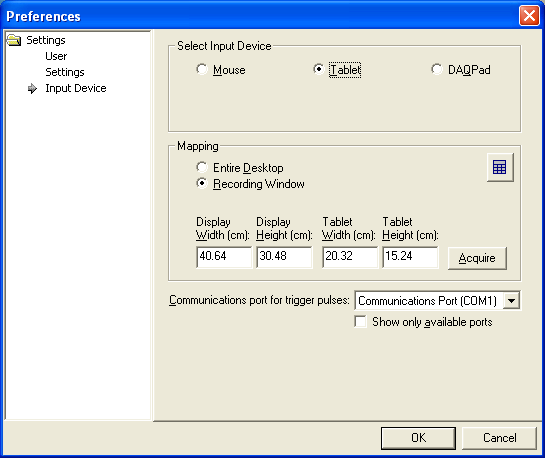
To alter the application settings, click "Select Input Device..." from the Settings menu.
Important settings involve not only the type of input device, but also tablet size, screen size (needed for real-size feedback) and whether mapping of the digitizer is the entire desktop (e.g., required for pen computers) or the recording window (required when tablet and display have different sizes).
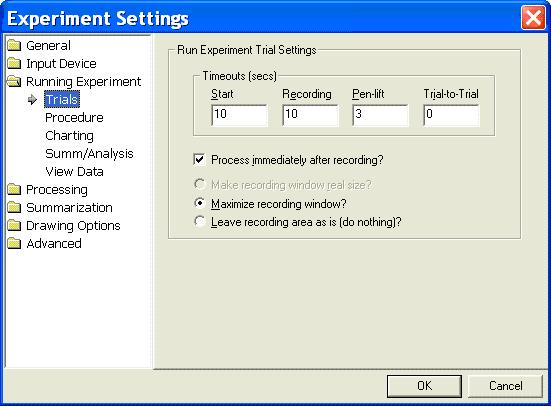
To alter the experiment settings, right-click on a given experiment and choose "Experiment Settings..." from the popup menu.
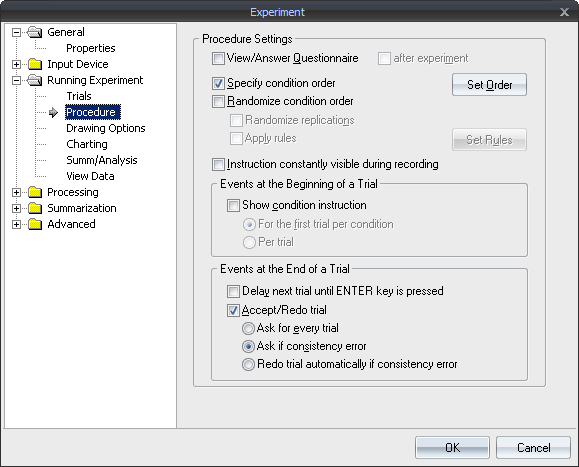
The following picture shows the options available during the actual trial procedure. You have the option to view/answer the subject questionnaire (must already be setup). Randomization of trials of trials can be done at the condition level only and even at the repetition level. Trial instructions (per condition) and end-of-trial events are also available...such as delays and trial acceptance.
The following picture shows the options available during the actual trial procedure. You have the option to view/answer the subject questionnaire (must already be setup). Randomization of trials of trials can be done at the condition level only and even at the repetition level. Trial instructions (per condition) and end-of-trial events are also available...such as delays and trial acceptance.
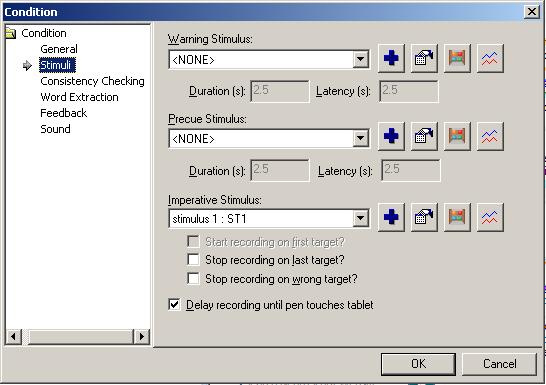
To alter the condition settings, right-click on the desired condition and choose "Properties..." from the popup menu. Then select the "Stimuli" option in the tree on the left.
In the condition, you impact a trial with the user instruction and various stimuli.
o Instruction as alphanumerics above the recording window shown when the trial begins. It can remain visible throughout the trial or disappear when the pen touches the tablet.
o A stroke description for determining consistency.
o A graphical warning stimulus with duration and a latency following it.
o A precue stimulus with duration and a latency following it.
o Then, the system is ready to start recording. The start and end of the recording depend upon the settings:
o Pressed means: Pressure >=Minimum Pen Pressure.
o Lifted means: Pressure <Minimum Pen Pressure but the lift is not as high as "out of proximity"..
o Out of proximity means: Pen lifted so high (~0.7 cm) that no data are received. Recording stalls. This causes a discontinuity. Any data after the first discontinuity will be disregarded when processing. These high pen lifts should only happen before the recording or after the recording.
o If no start option is checked, recording will start immediately. If the pen is lifted slightly, recording will start with a pen lift. However, if the pen is lifted outside of proximity, no data will be received. Recording resumes when the pen is in proximity. Therefore, it is not sure how much time has passed. The safest is to instruct subjects to have the pen on the paper (tablet) before the trial starts. The recording may thus start with a pen lift. When the pen is lifted, a faint trace is generated, and this trace is also recorded. Recording can start unnoticeably to the participant. This option must be used in reaction-time experiments.
o The following 4 start and stop options can be combined arbitrarily (except where noted):
| Option | Description |
MovAlyzeR Only |
| Delay recording until pen touches tablet | Starts recording as soon as the pen is brought from lifted (pressure < Minimum Pen Pressure) to pressed (pressure >= Minimum Pen Pressure). The recording will start with the pen on paper. When the Minimum Pen Pressure = 0, the recording will begin as soon as the pen is brought within proximity of the tablet. NOTE: Cannot be used if "Start recording on first target" is selected. | |
| Start recording on first target | Starts recording as soon as the pen, while pressed, reaches the first target. As long as the pen is outside the target, a faint trace is generated as if the pen was lifted but no data is recorded. NOTE: Cannot be used if "Delay recording until pen touches tablet" is selected. |
X |
| Stop recording on last target | Stops recording when the pen is brought from outside the last target, irrespective of pen pressure, to inside the last target while pressure >=Minimum Pen Pressure. NOTE: If "Start recording on first target" is selected, the recording will NOT stop unless you have reached the first target with pen pressed. |
X |
| Stop recording on wrong target | Stops recording when the pen is pressed inside an out-of-sequence target. NOTE: If "Start recording on first target" is selected, the recording will NOT stop unless you have reached the first target with pen pressed. |
X |
NOTE: For both options Stop recording on last target and Stop recording on wrong target, though recording stops after the last or the wrong target is reached, the pen movement trace after recording in stopped is still visible on the screen.
o In general, a trial can end when the pen is lifted for more than the pen-lift time.
o In addition, a trial can end when the total recording time is exceeded, independently of whether the pen is pressed or lifted.
| See Also |
NSHelp: Viewing Trials | Run Experiment Trial Settings | Testing Subject
© NeuroScript LLC. All Rights Reserved.